How to stack and align images to create panoramas
How to take panorama shots. and which free tools to use to align and stack multiple images, to create a seamless panorama shot
Panorama shots can be extremely powerful, and are a great way to catch the observer's attention.
There are many things that make a panorama shot an eye-catching vision: the unusual field of view, the crop ratio (usually wider), and the ability to concentrate in a single shot all the things that otherwise would require us to turn around.
What it takes to create a pano shot
Ok, we all agree that pano shots are thrilling. But how can we create them?
First of all, we have to find a good subject. Then, we have to compose the shots, and finally we have to merge all the shots into a single one.
Easy, isn't it?!
Not at all. Or, at least, it is not easy, unless you know some tricks.
If you ever tried to create a pano shot simply rotating your camera, probably you ended up with an irregular shape, thinner in the center, and a bit distorted.
So how can we fix this?
Let's proceed first things first.
Find a good subject
Pano shots are mandatory for some subjects: for example, if you want to shoot the whole milky way arch. i fact, there is no way (as far as I know) to do it with a single frame.
For the milky way, the best approach is to take more or less 7 vertical shots, and then merge them together.
Another good subject are the so-called "roof-top panorama": if you have ever seen these incredible cityscapes, for sure you know what I mean!
But there are other situations in which it is possible to get the shot with a single frame (using a ultra wide angle lens), but it is better to do it with a panorama (multiple shots with a longer lens). For example, if you need a higher resolution shot.
But even more important, if you need to limit the distorsion due to the wide angle lens. This is the typical case of architectural and real estate photography.
Take the shots
First of all, the composition; there are some tips you should never forget, when it comes to create a panorama:
Use a pano head (difficult).
This is a particular type of tripod head that permits the camera to rotate around a fulcrum that pass exactly through the camera sensor. This way, you can reduce parallax errors near to zero. The problem is that this piece of gear is huge, expensive, and it takes time to correctly set it up. So, unless you are extremely into panorama photography, probably you will immediately skip to the second point.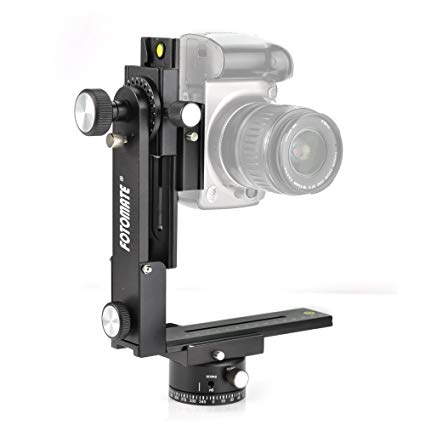
Use an L-shaped hand grip.
This relatively cheap piece of equipment is absolutely great when you want to shoot with portrait orientation, because you don't have to turn your tripol head on a side: you simply take the camera off, and remount it vertically. This way, when you will rotate, you will do it staying on the vertical axis that passes through the CCD. This make so much easier to stick together the shots in the future.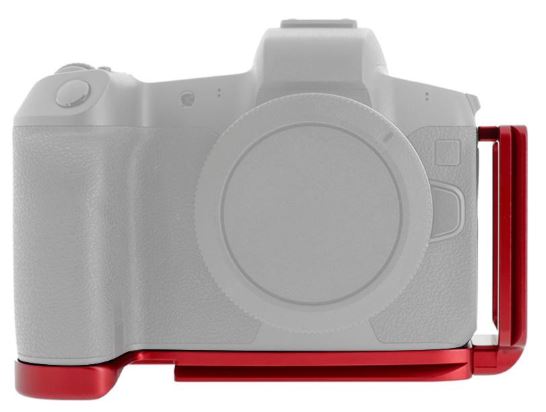
Shoot in M mode
Don't be scared of this. The point is that if all the shots are taken with the same settings, it will be a lot easier to stitch'em together for a pano shot.
Keep a lot of spare space.
If you think you need only 7 vertical shots to take the whole scene, do yourself a favour and take 8 (or even 9!). Yes.... start the sequence keeping a bit more space on the left, and finish keeping a bit more on the right. This is because, when you will merge everything together, probably you will find out strange distortion on the borders.. and it is always better to have something to cut away, instead of a piece of scene to reconstruct!Use a spirit level
If you level your tripod perfectly, then when you will rotate the camera you will never had to recompose the shot. You will be able to take perfect aligned images, simply rotating the tripod head.Keep it simple.
At least at the beginning, start with a simple project: rotate the tripod head and do not recompose. This way you will be able to gain experience in stitching pictures without going crazy.Start from the left
Of course, stitching softwares do not make difference if you started shooting your sequence from the left or from the right. But when you will be back home, and you will see your hundreds of shots on the PC... probably it would be difficult for you to recall exactly what you did, and the choices you made. So, reading the sequence from left to right will make it easier to spot it. Just a simple trick to save time.The longer, the better
You will find that it will be a lot easier to stitch together the images, if you shot them with a longer lens. I mean: if you can choose, it is better to take 10 images with a 50mm, instead of 6 with a 16mm. This is because of the greater distortion at the corners, that obviously comes with a ultra wide angle. Sometimes you have no choice, but if you can.. go with a longer lens.
Merge everything together
Now it is time to give the final shape to the shot you already created in your mind, when you was out on the filed. The problem here is to fulfill the expectations you had.
This is why I will never stress enough the importance of the tips above: in many cases, if you do not take into account the things I told you above, you will never be able to get a decent result. And no software will be able to fix an error done on the field!
I am sharing with you my own real experience as a landscape photographer. Getting back with a good panorama shot is something that requires a lot of "try and fail"; during my photography workshops I do my very best to teach my students what it really makes the difference between a good try and a success story.
But let's proceed, I will share with you my own photography workflow for panorama shots. I'm sure that other photographers can do it differently; this is not 100% perfect, but it works for me and I find it quite straightforward.
Import the shots into Lightroom
Here I will assume you are using a non-destructive editor / raw converter like Lightroom, Capture One or even Affinity Photo. This way you will be able to see the whole sequence, and check that the single images overlaps correctly.Apply a basic correction
Since you shot in manual mode, you can make your adjustments on the first shot, and then syncronize all the sequence. Remember, always apply lens correction profile : the stitching process will work a lot better!Export the shots in TIFF format
Even if many software are able to deal directly with the RAW files, in my personal experience it is easier to export the sequence as TIFF files. To keep everything clean, I suggest you to create a dedicated "tiff" folder under the parent directory, and export the files into that. Of course, remember to choose uncompressed, 16bit TIFF, to keep all the information in the output file.
The software
This is probably the most interesting part of this photography blog article. There are tons of software that are able to stitch images together to create a panorama shot; some of them are totally free, and for others you have to buy a license. Here I will speak only about 3 of the "free" ones: Lightroom, Hugin and Microsoft ICE
Lightroom
It is probably the most common one. Technically it is not free, but probably you are already using it. Anyway, you can do the same things in Camera Raw, the only difference is in the interface.
Lightroom is able to do both Panorama and HDR Panorama: this is a freakin' useful feature, because otherwise you have to create an HDR image before stitching the images together. And this is very time consuming. The downside of the HDR Panorama is that, for every "slice", you have to have the 3 bracketed shots. You cannot use a number of brackets different for each slide.
Lightroom is very easy, but easiness comes with its downside: you have very little options to choose from. The most important one is the type of projection (The projection is the algorithm used to map the 3D scene over a 2D image..
Hugin
Honestly, it was the first software I used to stitch images together. Yes, because I was a Linux guy, so I used only free (and Open Source) image editing software. You got it: Hugin is not only free, but it is also Open Source. What does it means? It means that it has tons of options (especially the type of available projections), there are a lot of developers that work to improve it more and more... From the other side, as all the open source tools, it lacks of documentation... and even if there are instructions, many times are not up-to-date (i.e. new features are not documented!).
As already told, the big advantage of Hugin is that it is a multi-platform software: PC, Mac and even Linux!
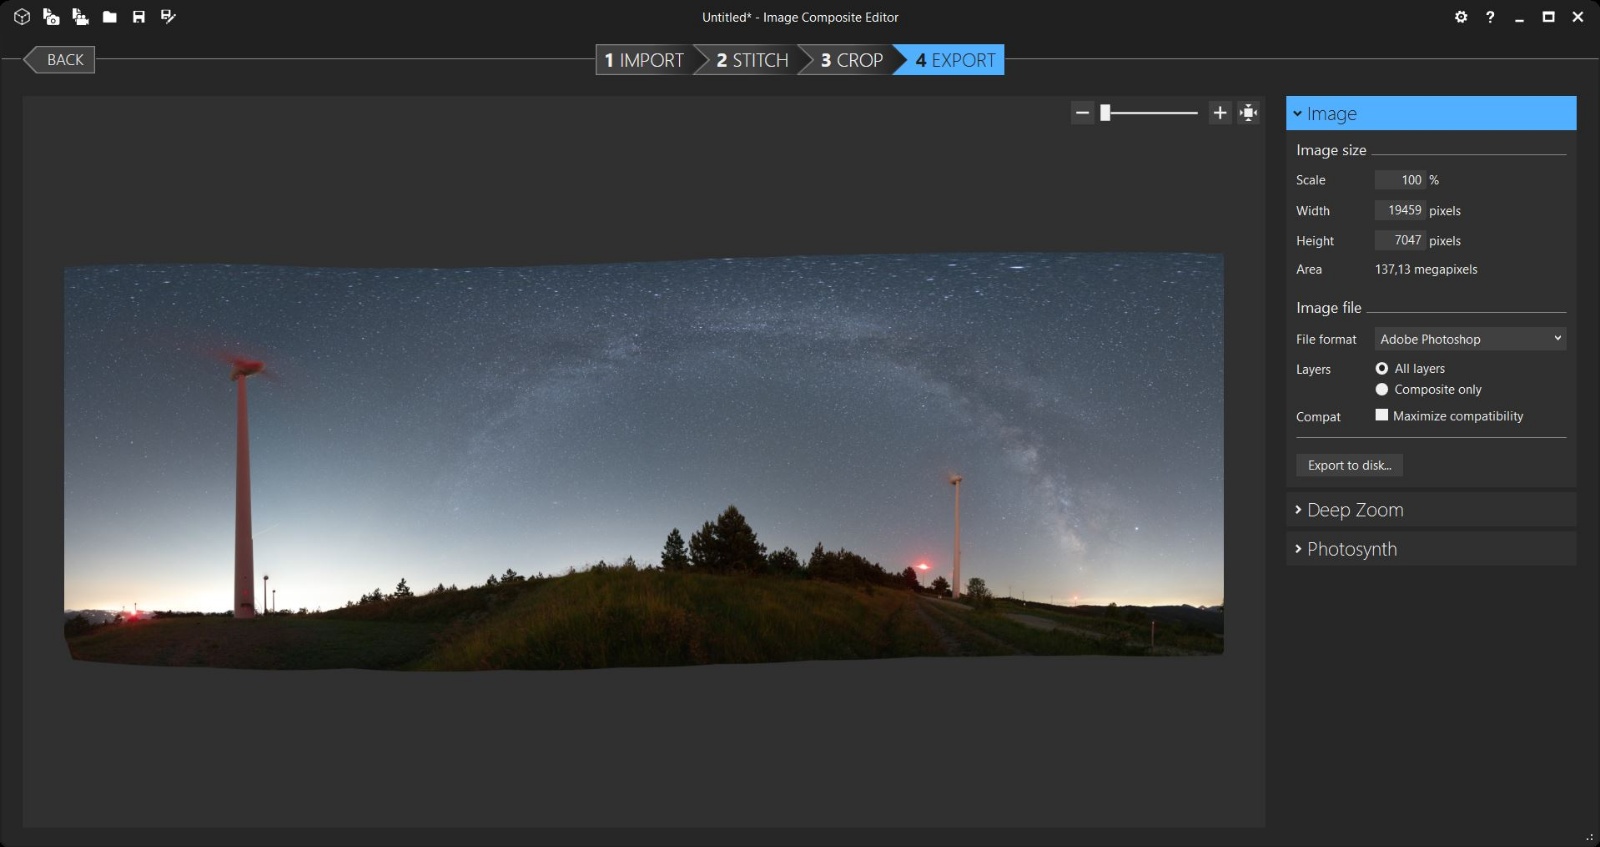
Microsoft ICE
ICE stands for "Image Composite Editor". It is an "advanced panoramic image stitcher created by the Microsoft Research Computational Photography Group". The guys in Redmond released it as a free software, and this is a very good thing. But the best one is that works very well, comes with a clean user interface, and has a lot of advanced options; one of the thing I still have to test is that ICE can also create panoramas from a panning video, including stop-motion action overlaid on the background.
It is very simple to use, and the final result can be saved in a lot of different formats (even Photoshop file with all the layers!)
Using the tools
Just to anticipate you the conclusion: I didn't find the perfect tool. I found out that every scene is different, so (for example) ICE can be perfect for a series, but for another one Hugin performs a lot better.
Creating a panoramic shot is not an automatic process: as stated before, you must start following the photo tips above, and then you should give a try to each software.
Lightroom
It couldn't be simpler: directly from Lightroom (without exporting the file in TIFF format), after applying the lens correction profile, just select all the "slices" composing the series, right-click and choose "merge into Panorama". That's it.
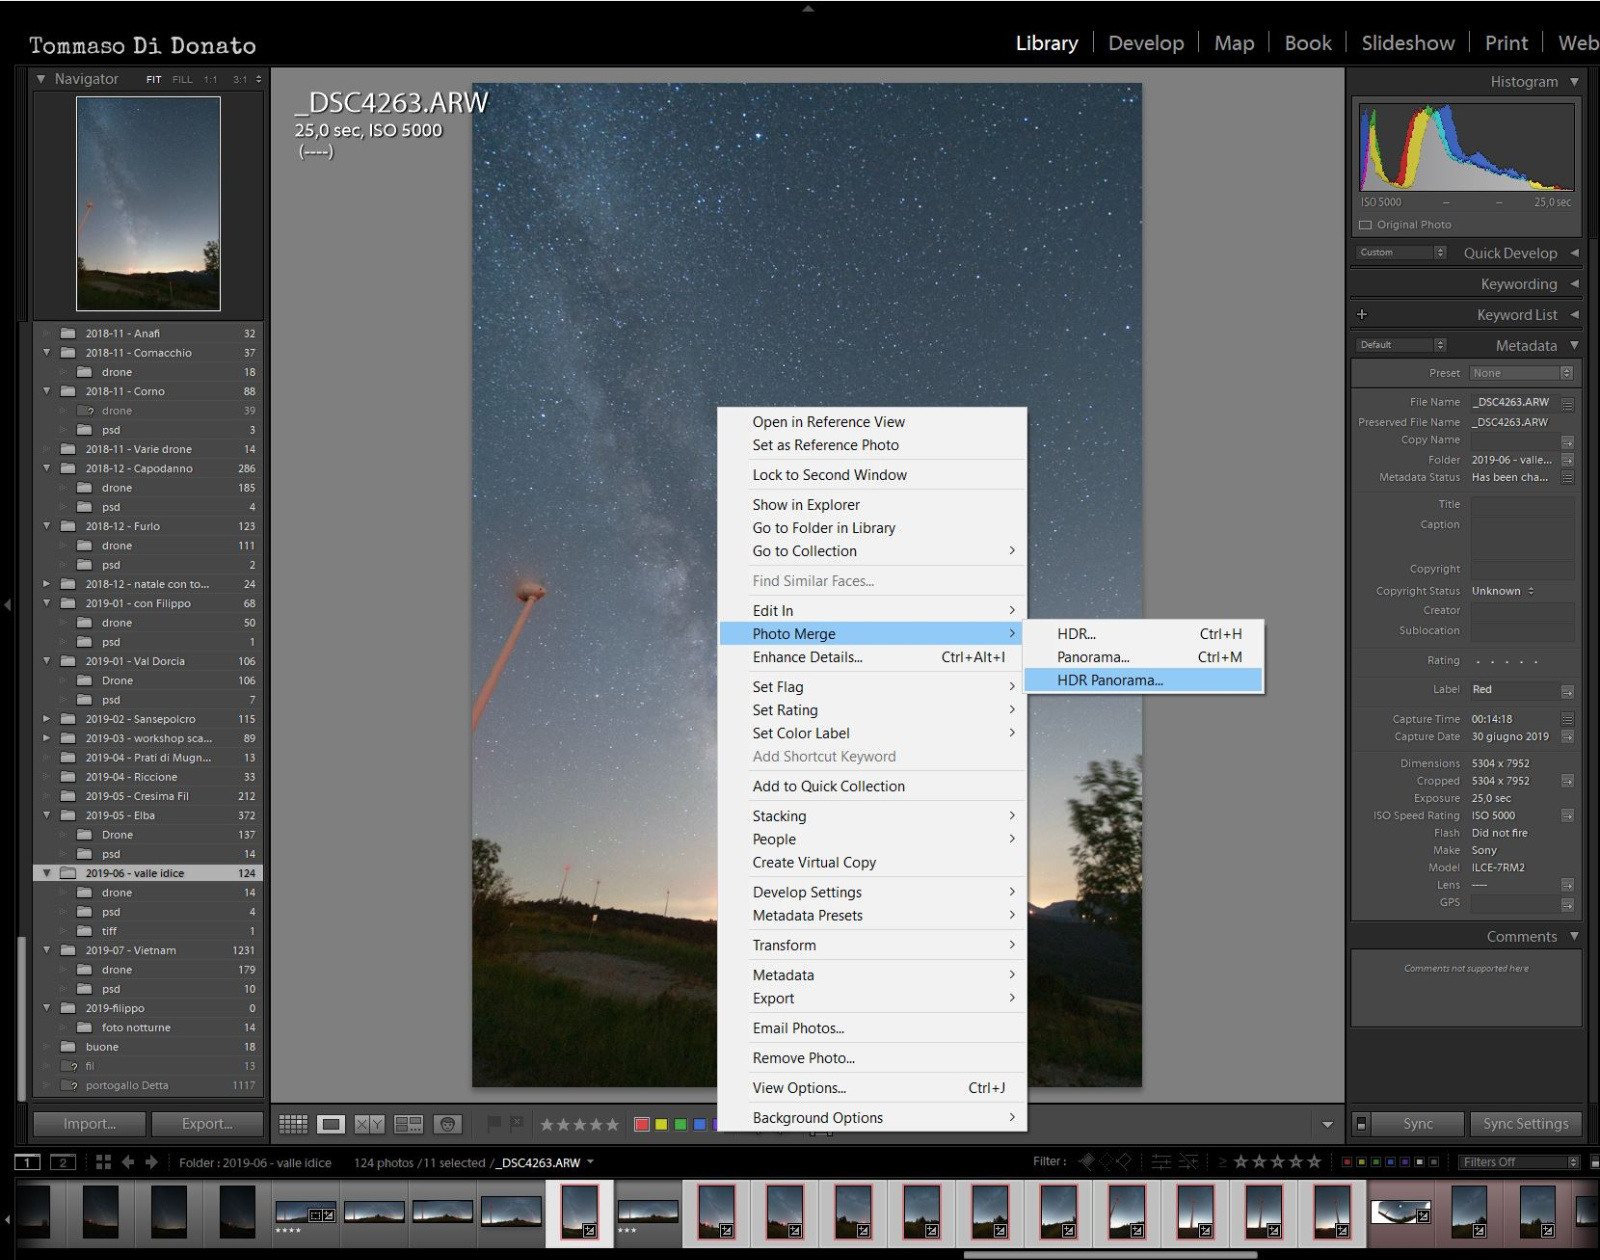
A new window will open, where you can choose between 3 projections (the last one usually does not work). If you like the final result, go on and the merged picture will appear "immediately" in your library. You can tweak and fine-tune it, like a normal 16bit shot (it is a DNG file).
Hugin
Of the three software analyzed, Hugin is the most complicated one.
Before starting, I really suggest you to go into the Preferences menu, and check the option to use GPU computational power (if you do not do it, it will take you about one our to stitch a single panorama!)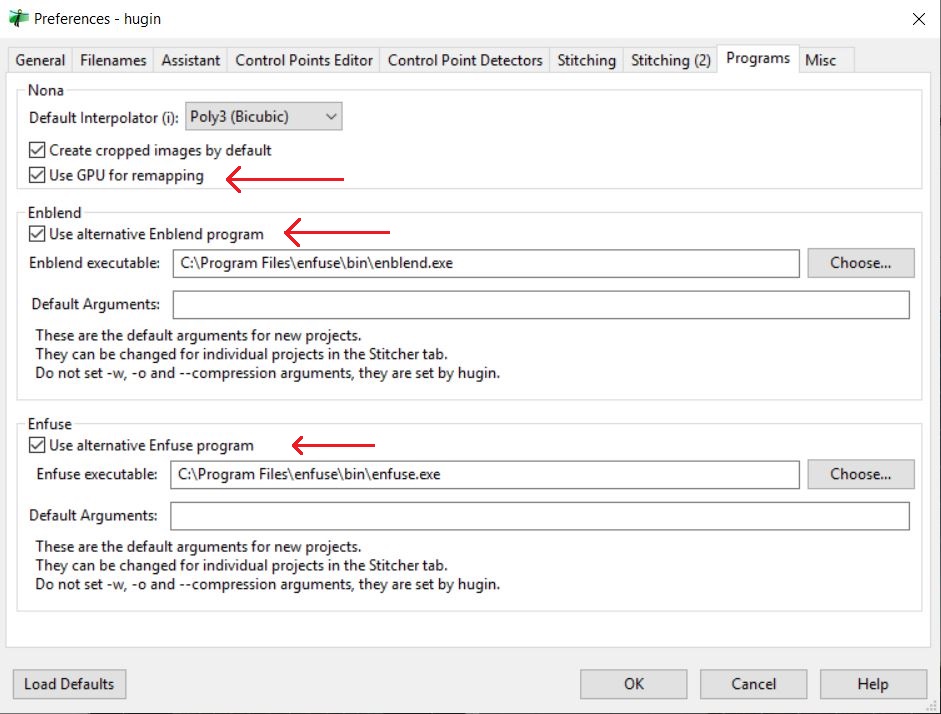
There are 2 more options here, about helper programs to use for blending/fusing images together. I suggest you to download the suite enblend/enfuse from the internet, and use it in case you end up with poorly blended final panoramas.
Now, as stated, it is better to start from the exported TIFF files. You have to load them, from the "Assistant" tab (see pictures)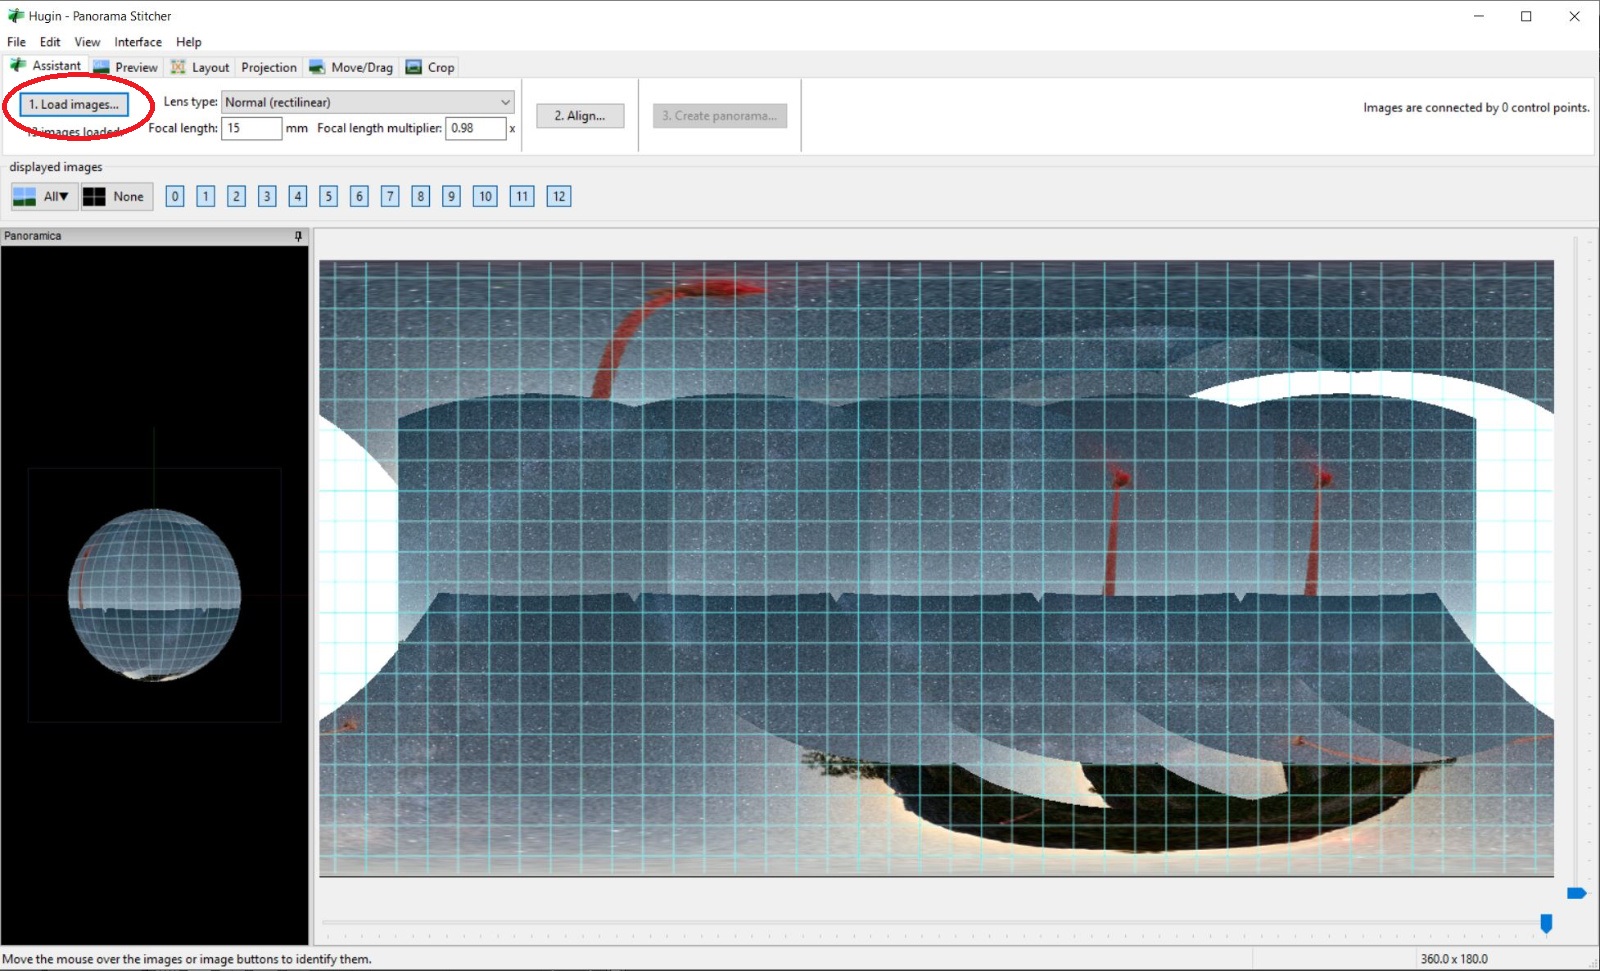
The preview will be messed up, but do not worry, you still have to align them (using the "Align" button):
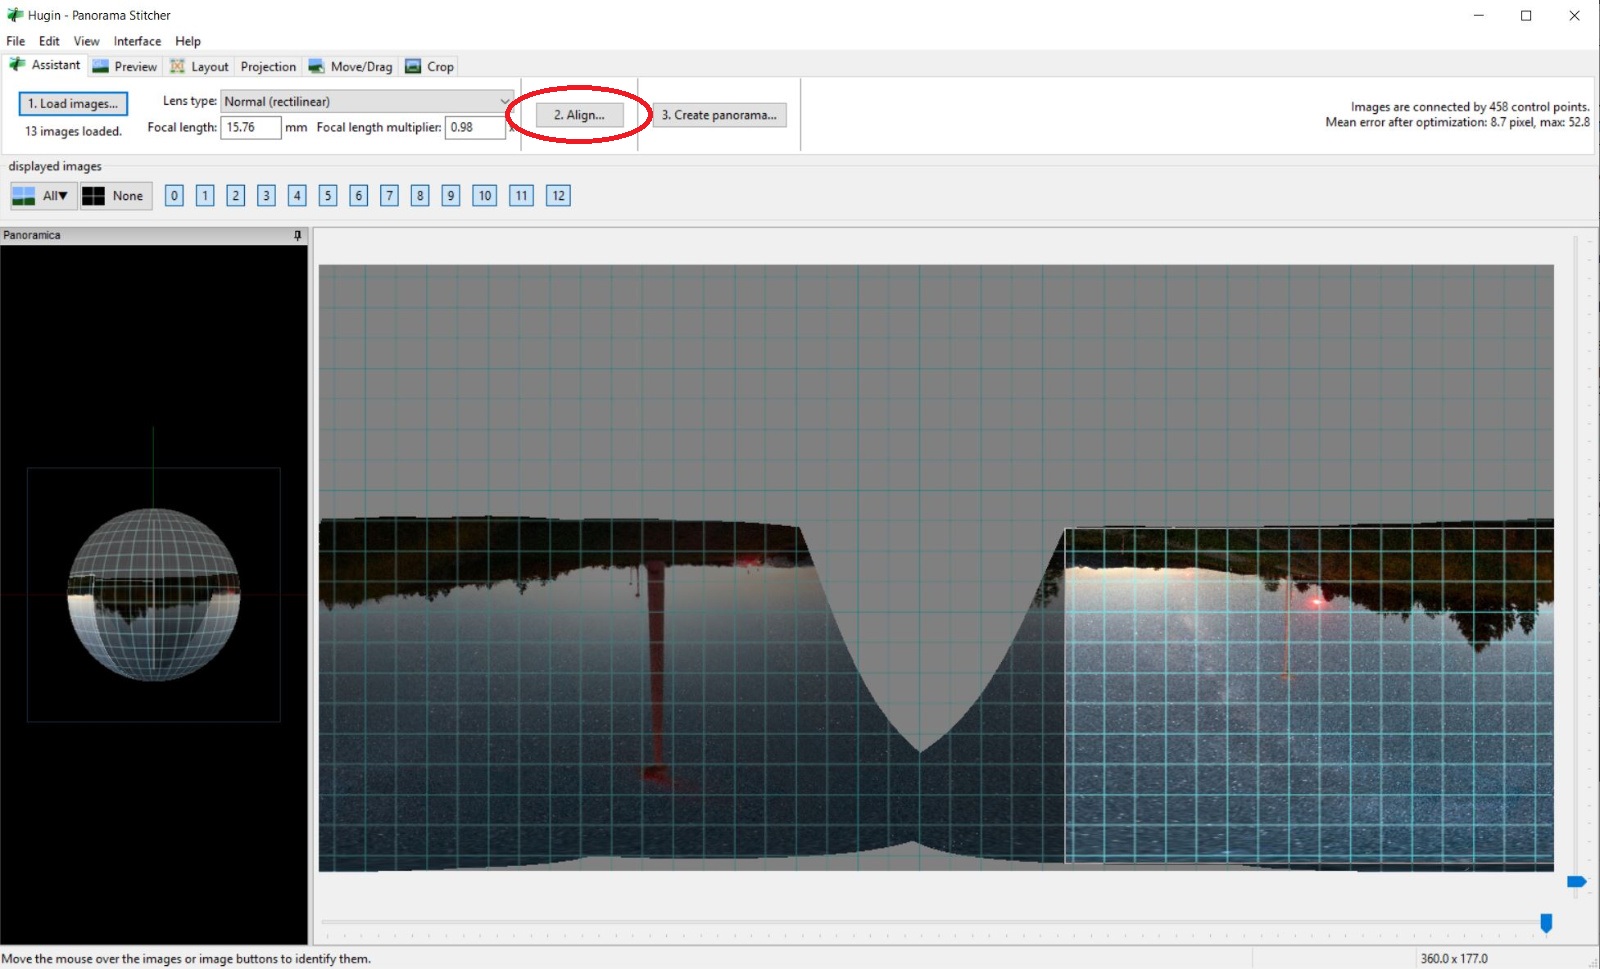
At this point, you will see a semi-final preview. You still have to go through some more steps (remember, I told you that Hugin has tons of option, do you remember?!); first, you can select the type of projection. The software probably will suggest you the best one, but you can change it anyway from the "Projection" tab: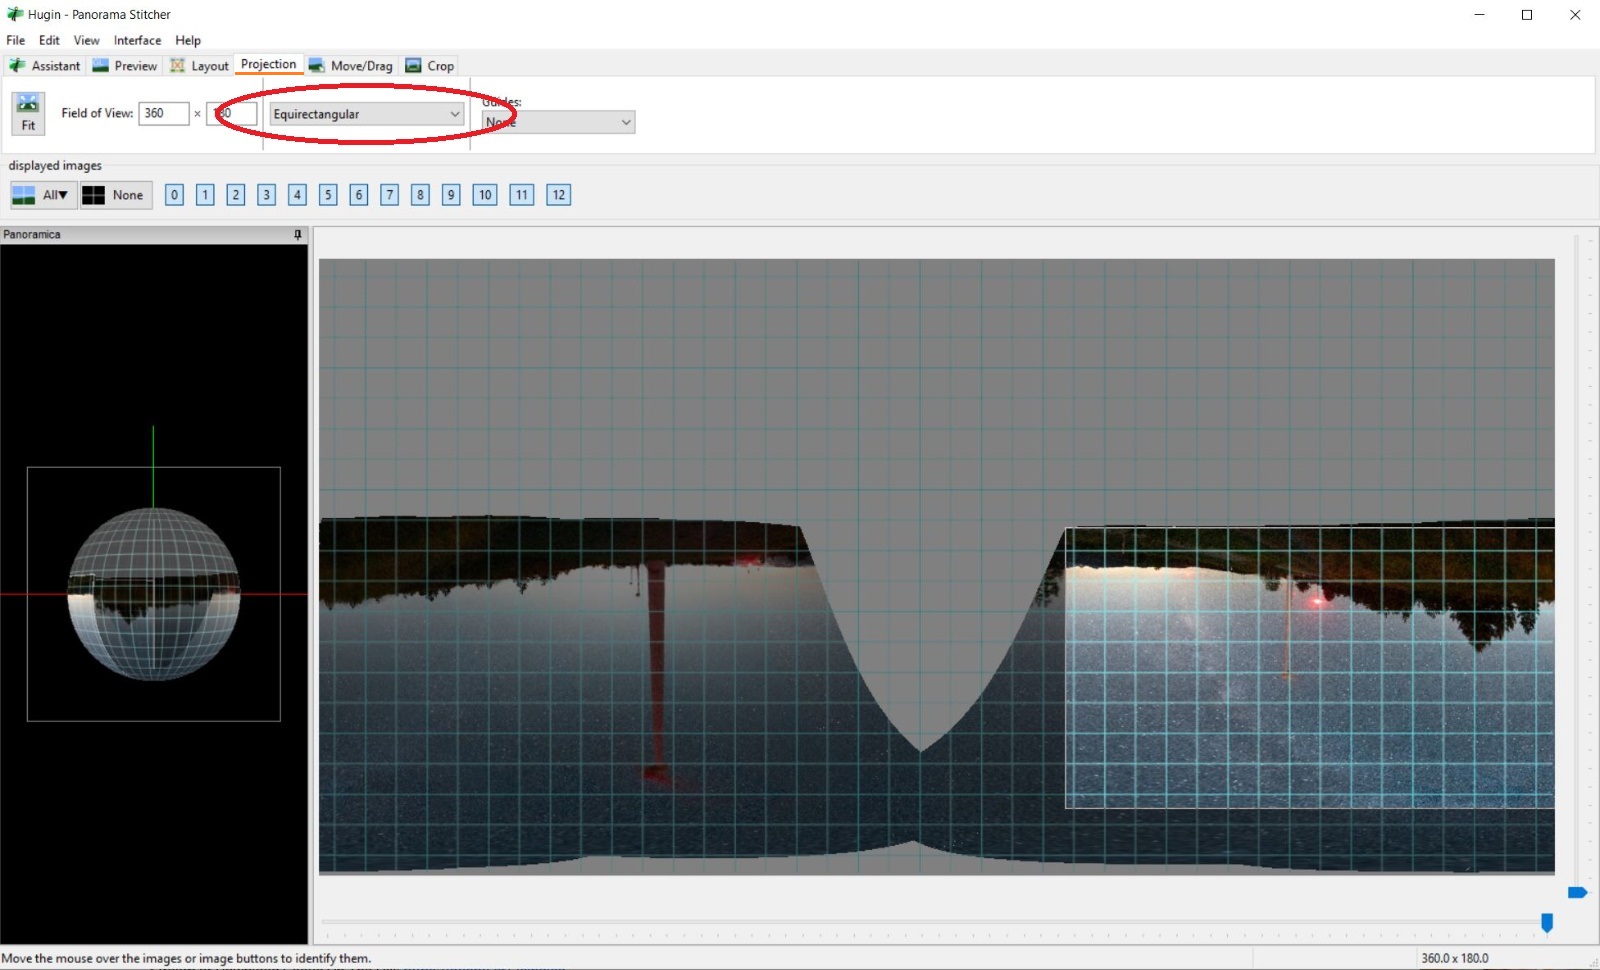
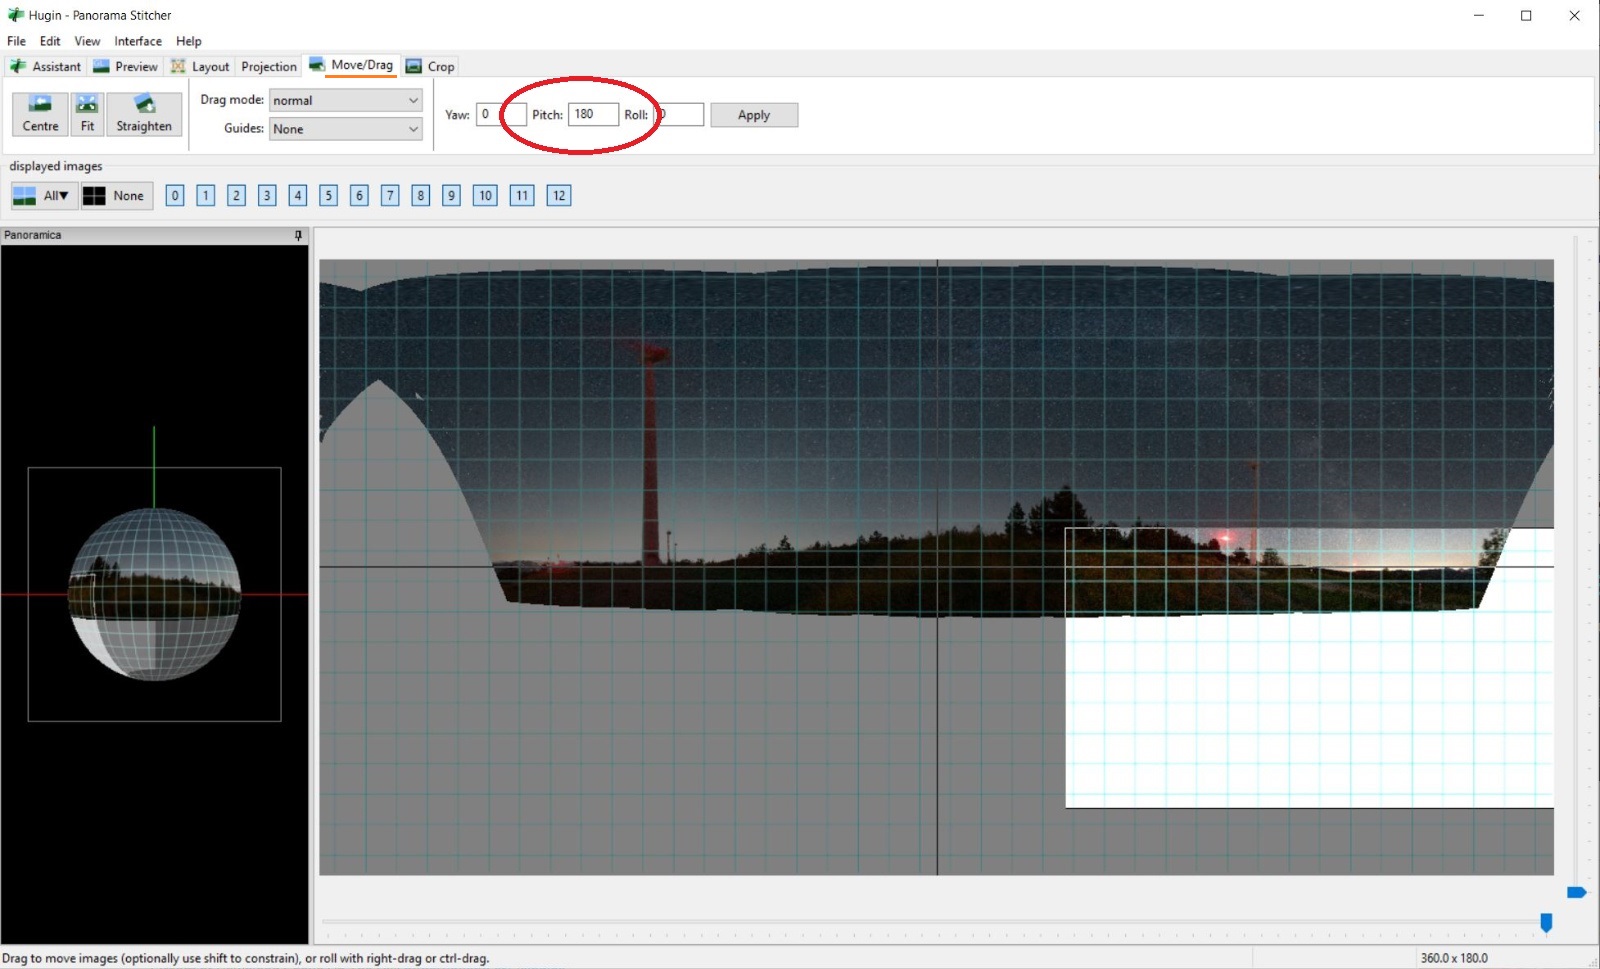
Sometimes, as in the example below, the software stitch the layers upside down. As stated in the Hugin documentation, Hugin stitches the panorama on a sphere and can't determine what is up or what is down. It can be easily fixed in the "move/drag" tab, typing "180" in the Pitch input box:
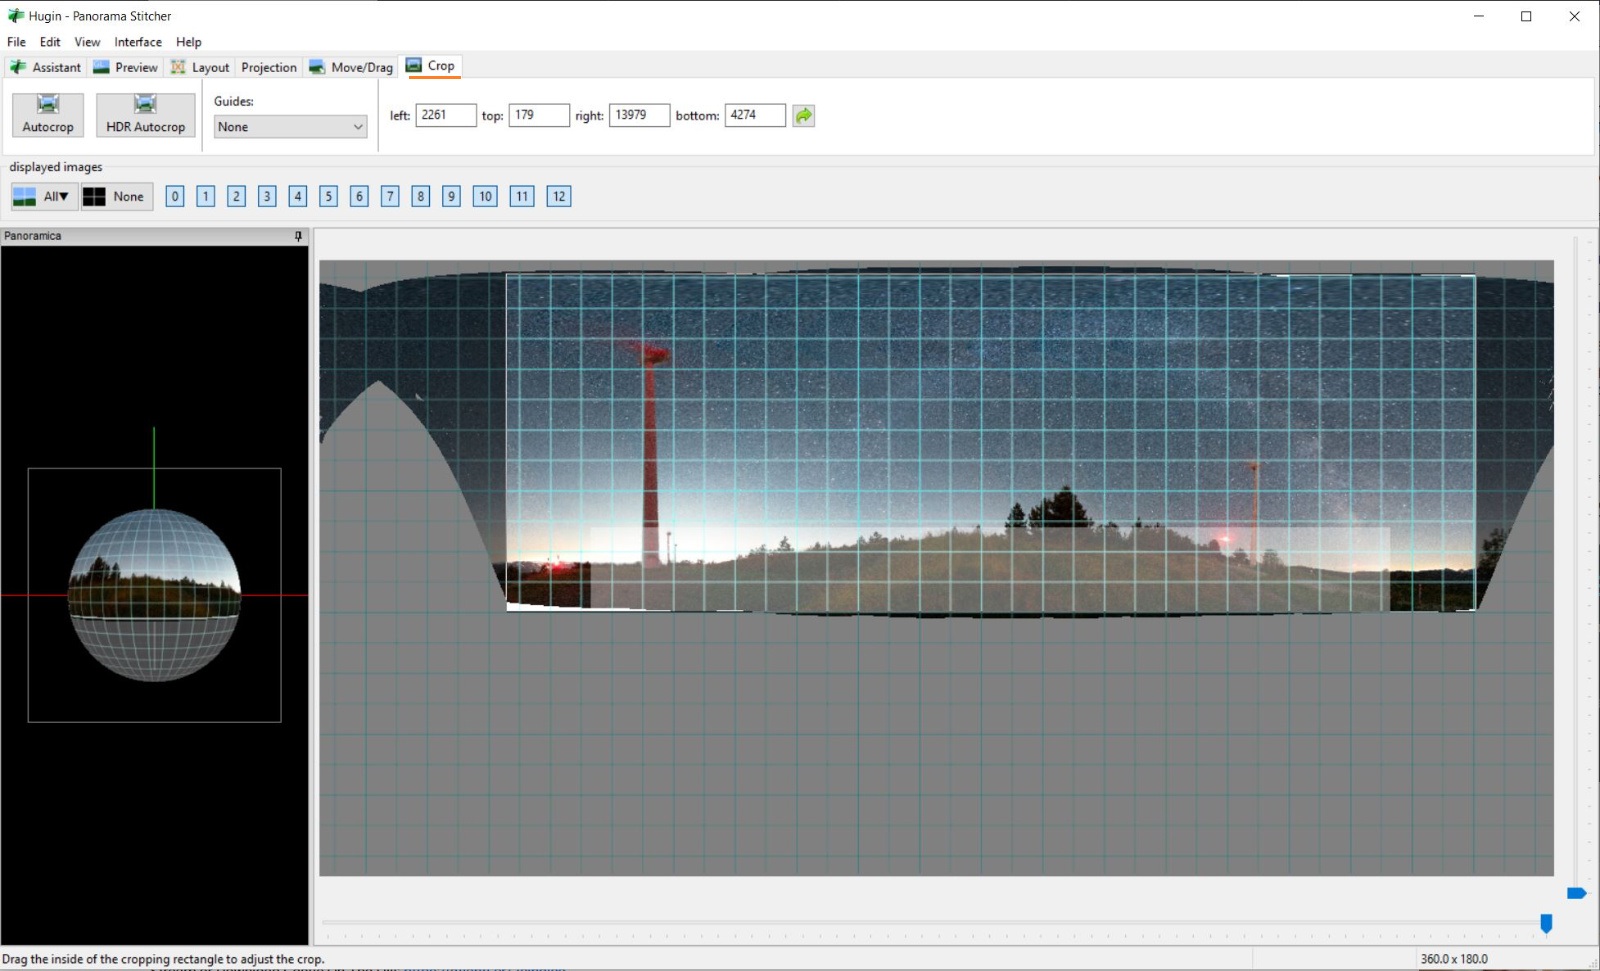
Now you can move, center and crop the final image form the "crop" tab:
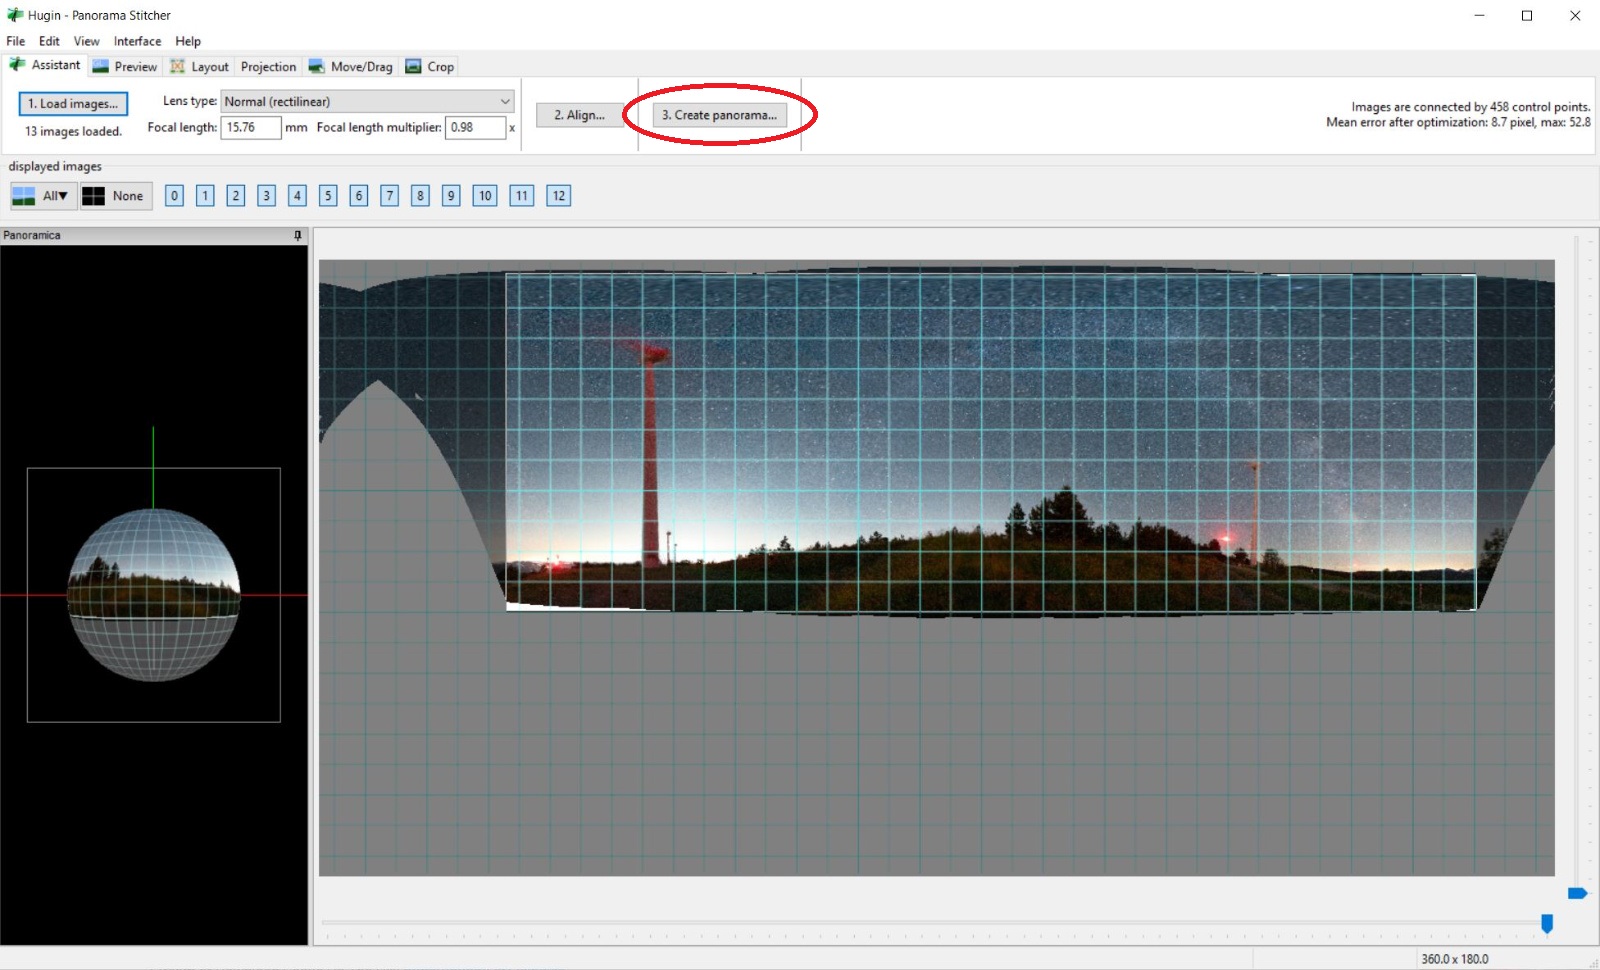
The last step is to create the final panorama image, going back to the "assistant" tab:
Now you can save the result, as a TIFF (or other formats) file. That's it. A bit tricky, but effective!
ICE
As soon as you launch the software, you will immediately notice how simple and intuitive is the user interface. All you have to do is to select the type of work (create a new panorama from images, or create a new panorama from a scrolling video. I still have to try this option!).
Once you loaded the slices, you can choose to go for a "Simple panorama", or for Advanced option (i.e. if you shot more raws, define the order of the slices, etc). Usually, the full auto approach is good enough for you not to take care of advanced options.
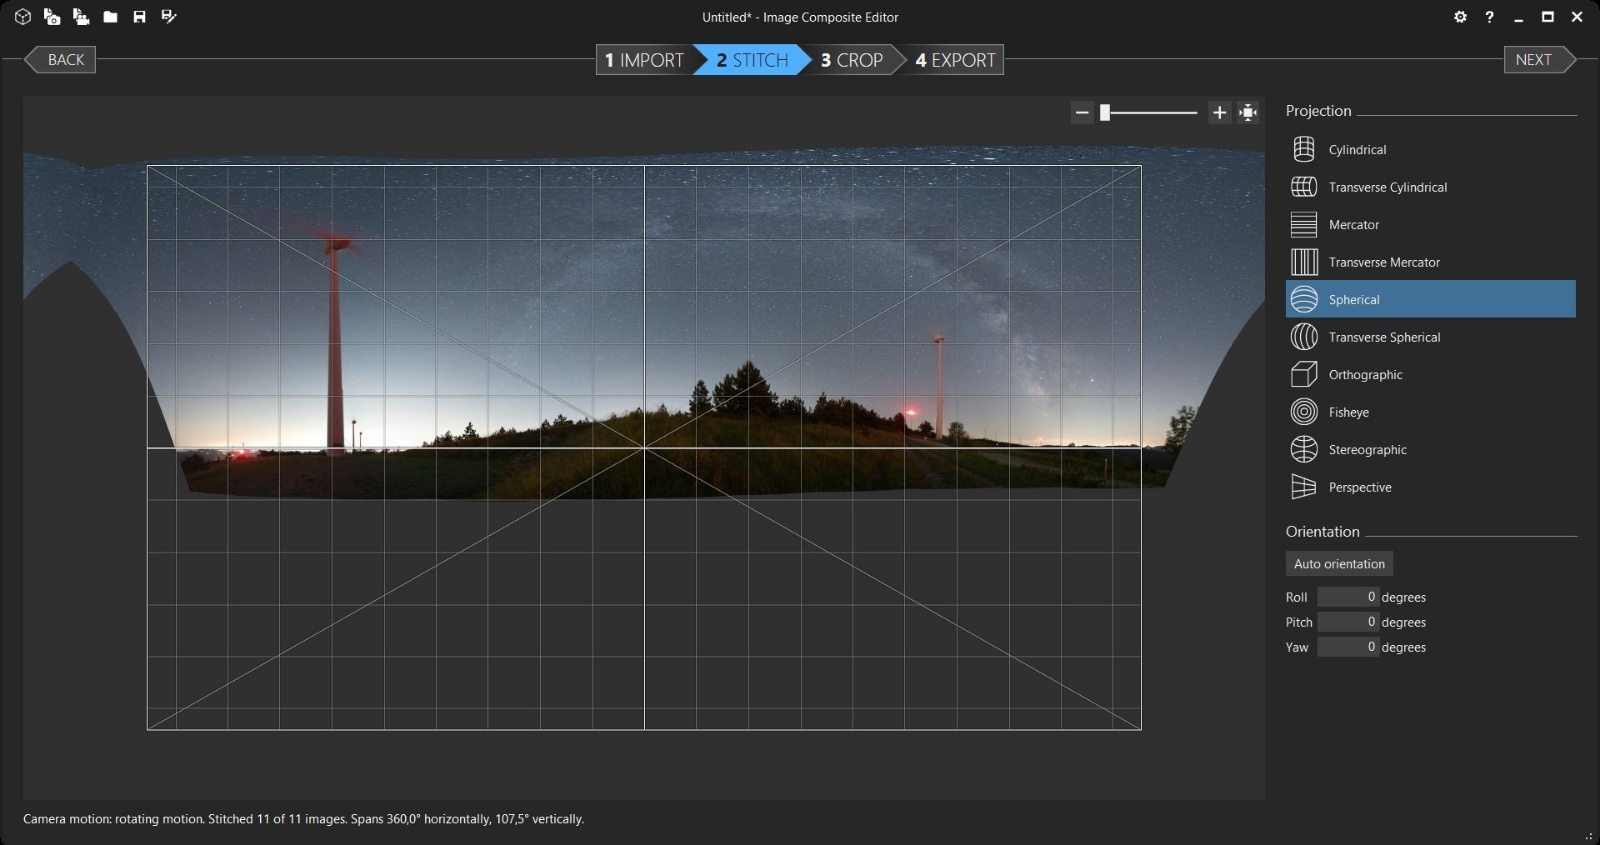
When you click on the "Next" button, the software will align the shots and then you will be asked to decide the type of projection. As you can see, you will have many choices.
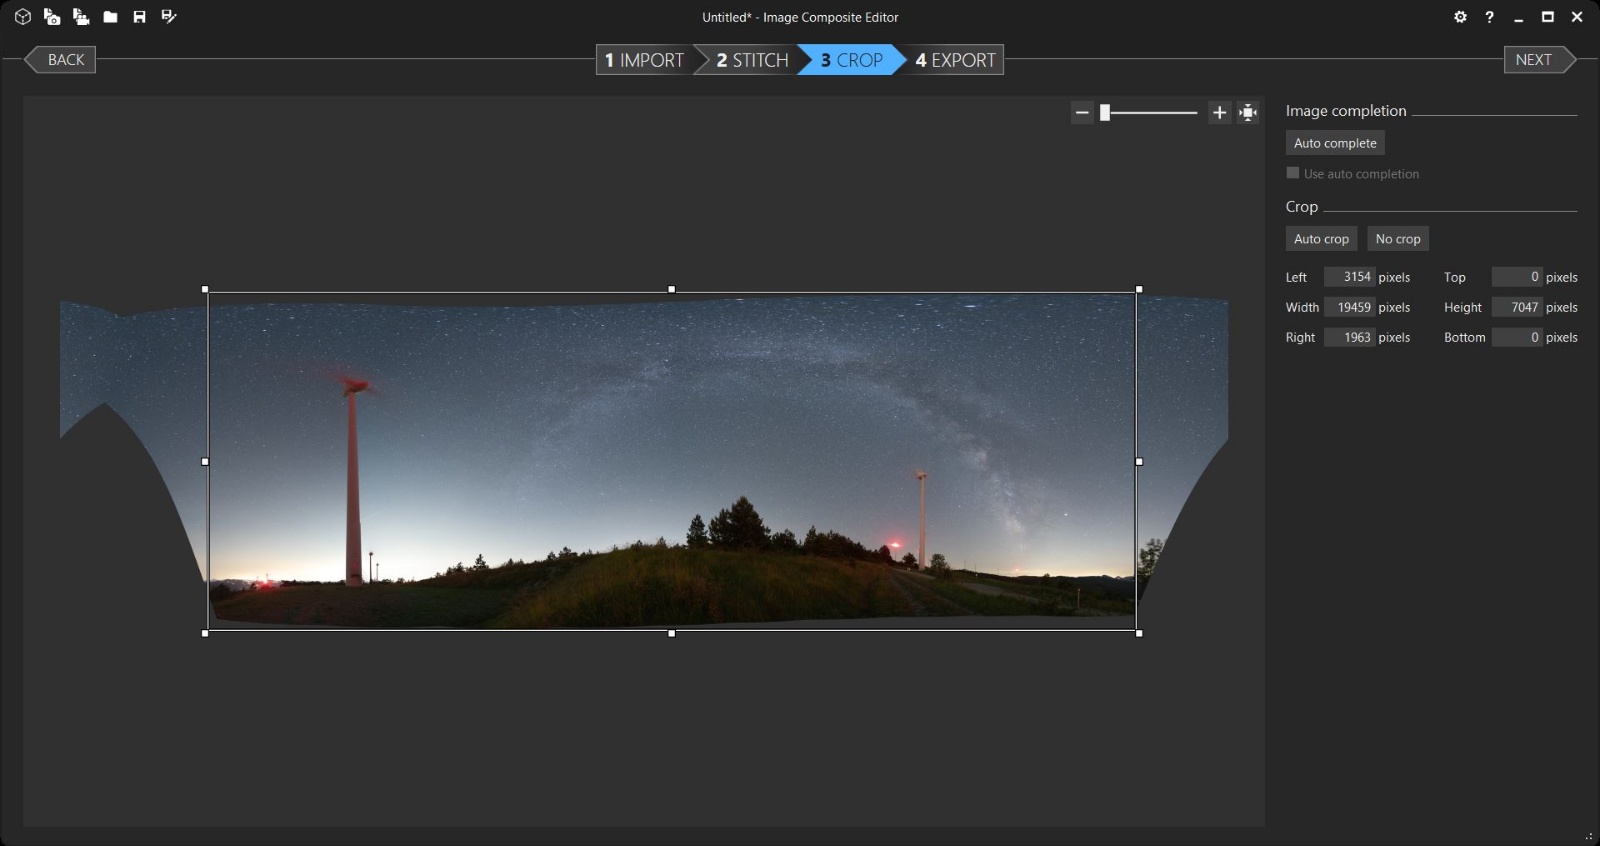
In the next step, you will choose the pano crop; you will also find some option for "auto completing" the image: if you try to include an empty area, Microsoft ICE will try to fill the gaps based on the content. It is exactly what Photoshop does when you choose "Content-aware fill". I prefer to do it in a second time, usually in photoshop, because I want the full control of the process.
The last step is the export of the final panorama. You can choose between many formats, but I prefer to export in Photoshop format; if you go that way, you can decide if to keep all the layers, or if to save a single merged layer. In any cases, I suggest you to check the "maximize compatibility" box (this way you can import it in Lightroom too).
Final comparison
But in the end.. which software is the best one?!
Let's see what I got from the 11 shots used in the above examples:
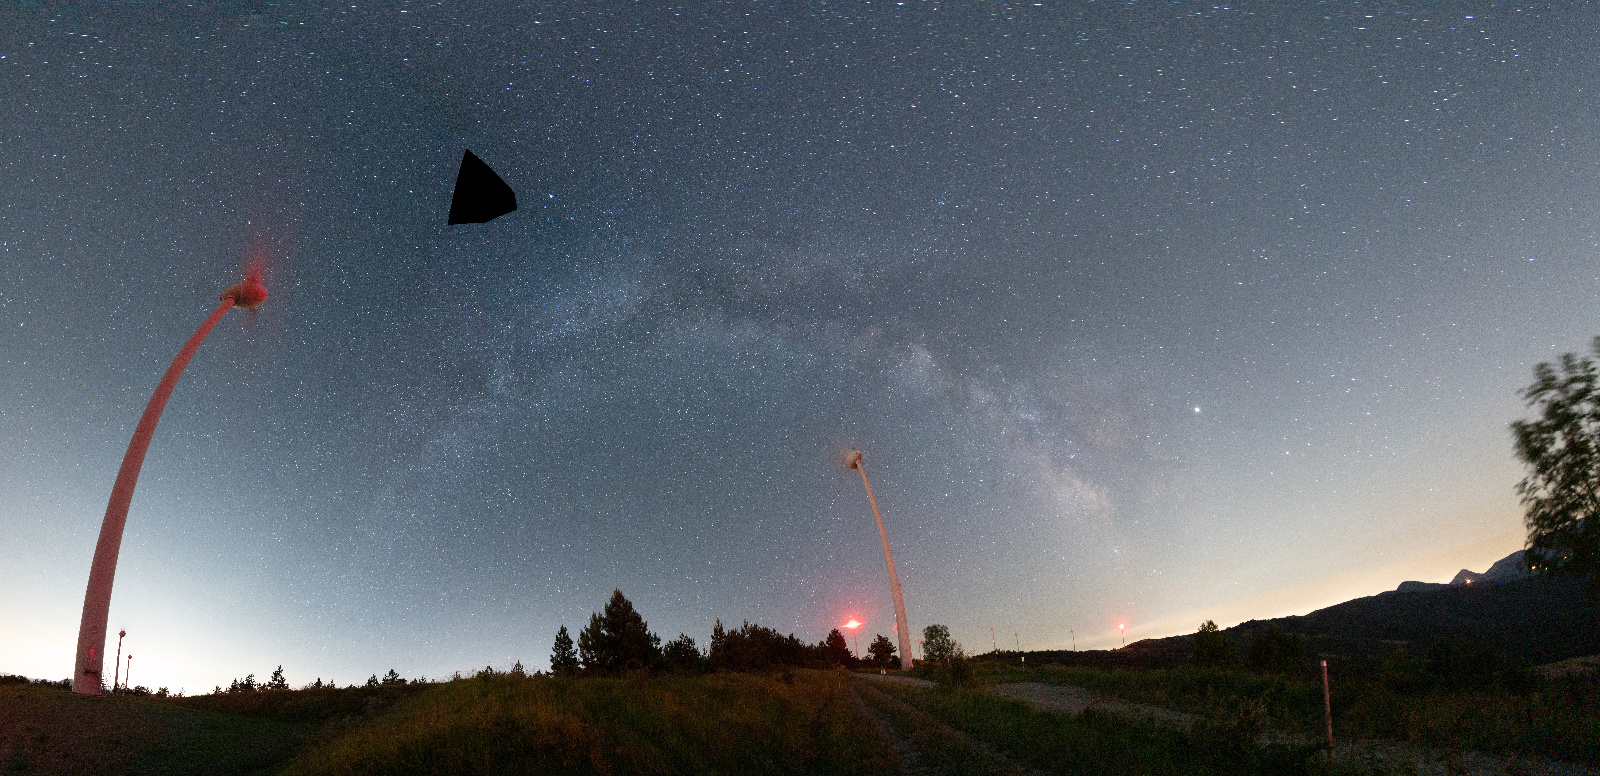

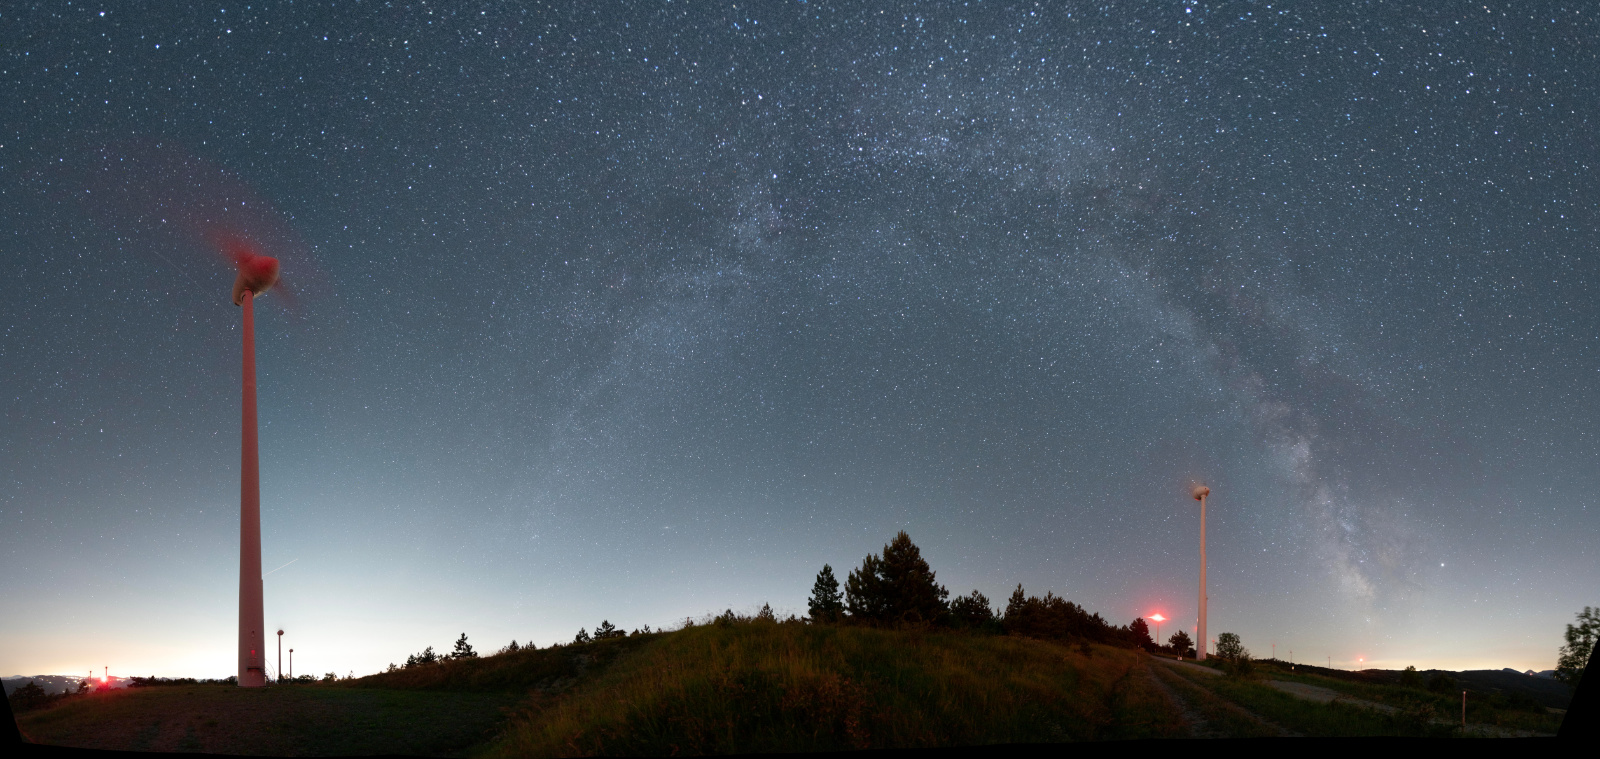
As you can see, in this example Hugin is the best performer: the Lightroom version is totally unacceptable, and the ICE one is a bit too much distorted (maybe I can get a better result, playing around with some advanced options).
So, do we have to say that Hugin is the software to use always? Not at all!
Let's see another example:
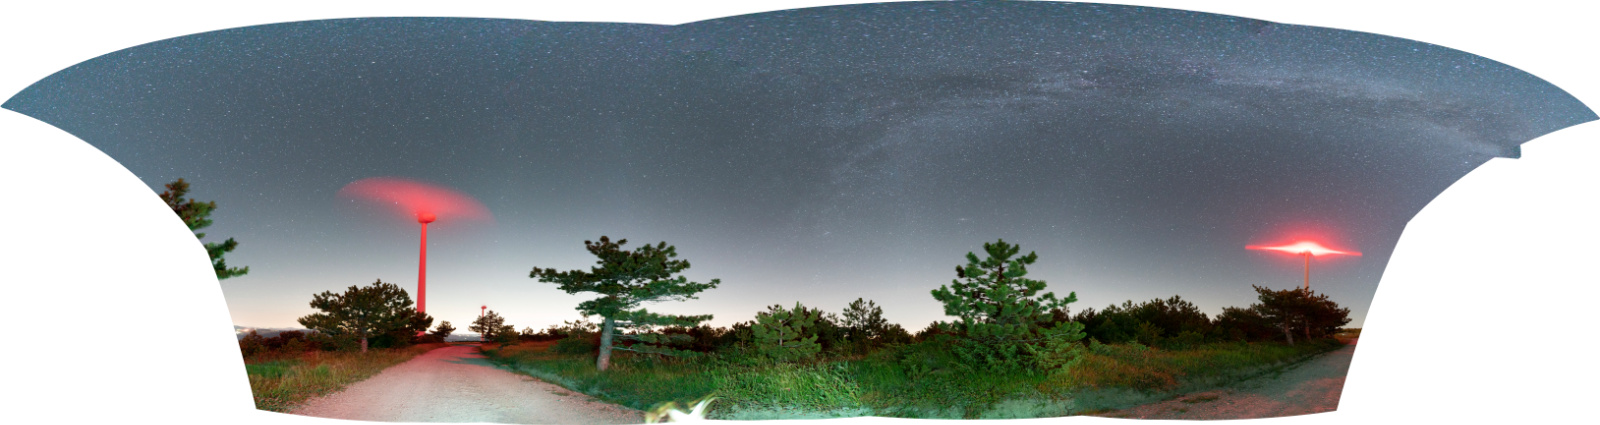
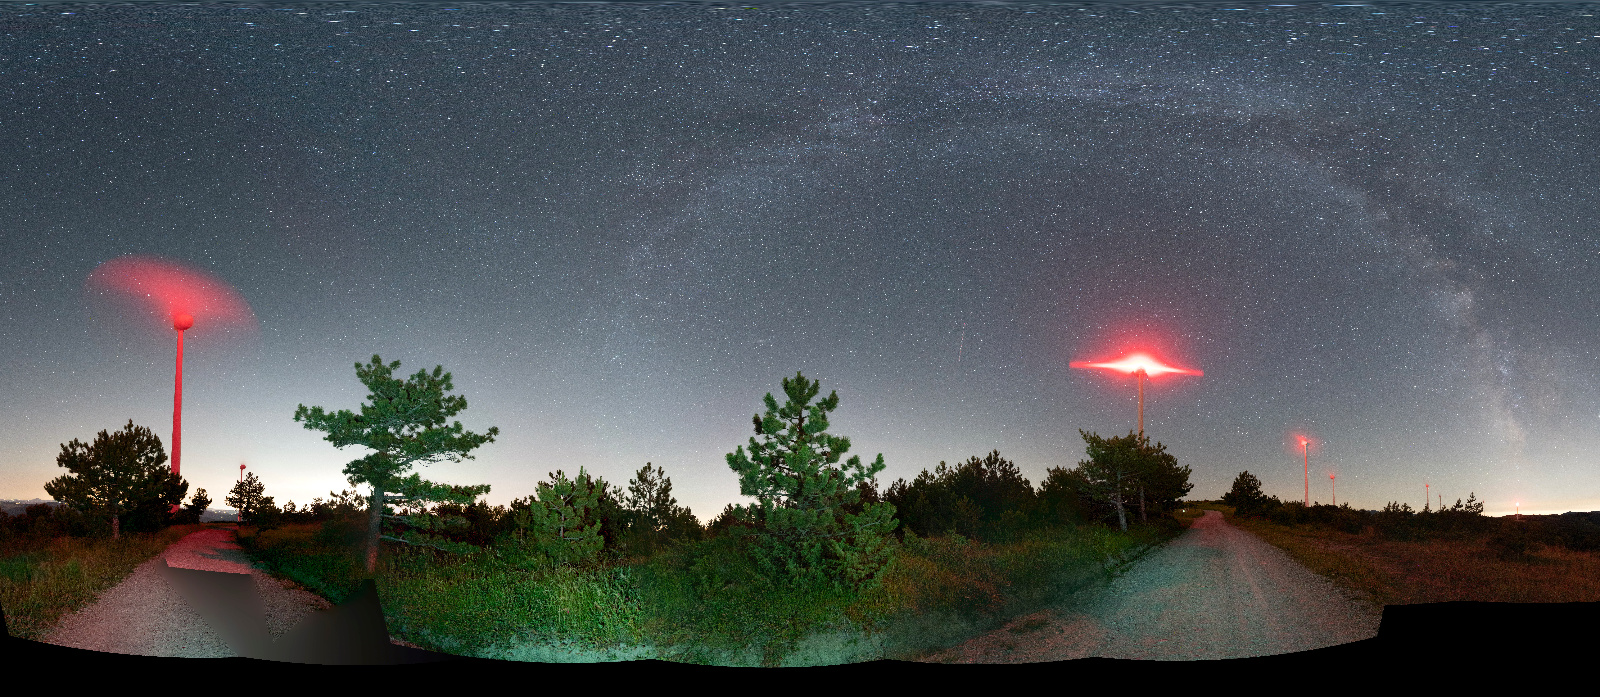
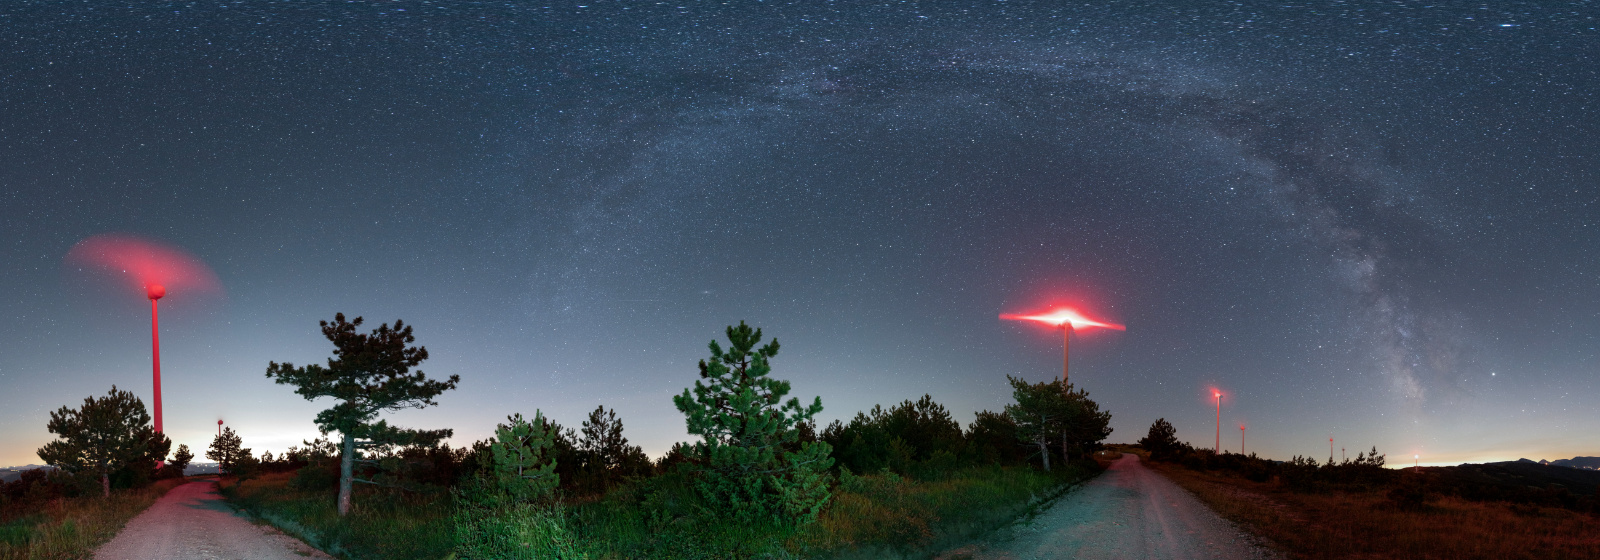
The Lightroom version still sucks (yep), but this time the best panorama is the one obtained via MS ICE; the Hugin one is messed on the lower left side, and is a bit degraded on the top.
Conclusions
I decided to test three free software to merge together multiple images and create a panorama shot: Lightroom, Hugin and ICE.
Which one is the best? Probably there is no final answer. For sure, Lightroom probably is the worst.
Both Hugin and ICE have lots of pros and cons.... let's try to summarize them:
Hugin
Pros: cross-platform, very accurate, tons of options
Cons: lack of documentation, low(er) performances, not so user-friendlyICE
Pros: incredibly user-friendly, very accurate, many options, many output formats
Cons: if you have to do something very complicated, probably doesn't have many "manual options"
So, long story short: they both are free, so I suggest you to test each time both, and see which panorama better suits your needs.
For the geeks out there: in case you have to do a very difficult merge, sometimes the software will not be able to align the shots. With Hugin, you can manually define or add the control points, so the process will be easier!


